Understanding partitions, volumes, and containers
Before we begin the discussion about how to create APFS containers, let us understand the basic terms like partitions, volumes, and containers. The term ‘partition’ is defined as the logical division on the hard drive. These partitions need to be formatted and mounted before the OS can read/write data into it.
Once the partition is formatted with a file system, then it is referred to as a volume. When the OS recognizes the file system, it will be mounted, so data can be read and written. These 2 terms, you probably already understand even before reading this article, but what may new to you is the term ‘container’. The Container is a term introduced with the new APFS file system.
A container is a space on the hard disk that contains one or more volumes. It is created in such a way that the container space is shared among all the volumes it holds. The size of the volume is not fixed in APFS. Although, while creating a volume, you assign a minimum and maximum amount of space, however the actual amount of space a volume uses changes dynamically. So, the volume can expand or shrink without the need for repartitioning.
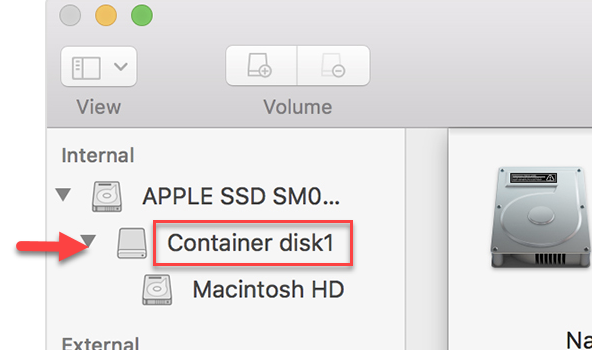
Also, another thing to be noted is that the disk can be divided into one or multiple containers. And each container can have one or more volumes like said before.
Next, let us see how to create a container in APFS file system.
- Go to Applications > Utilities folder and open Disk Utility
- In the Disk Utility window, click View > Show All Devices
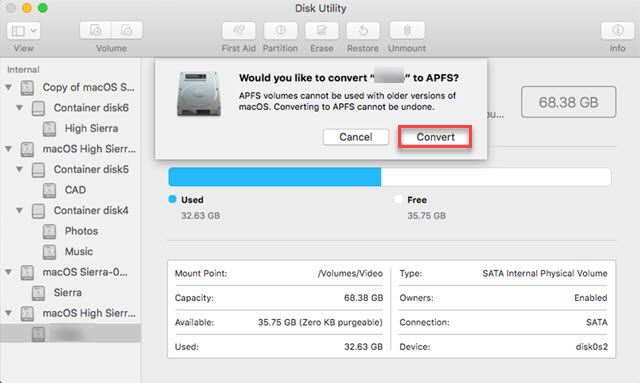
Now you will need to convert HFS to APFS file system. This conversion is automatic if using an SSD, otherwise, you will need to do it manually.
- From the list of all devices, choose the HFS+ volume and click Convert to APFS
- Next, to format the drive to APFS, first choose the drive and click Erase
- Assign a name and select the APFS file system format from the menu
- Then click Erase to format the drive
Now Disk Utility will create one container and one volume within that APFS container. But you can always add more containers according to your preference. By doing so, you can have groups of volumes. That way, one group of volumes is separated from the other and prevents sharing of disk space.
How to add containers?
Before you begin with this process, please make a backup of all data on your drive.
- Go to Disk Utility and select the APFS drive from the left menu bar
- Then click on Partition in the top menu
- Next, you will be asked if you want to add a volume or a partition. Click on the Partition button
- In the Partition window, click the ‘+’ symbol
- Assign a name to the partition
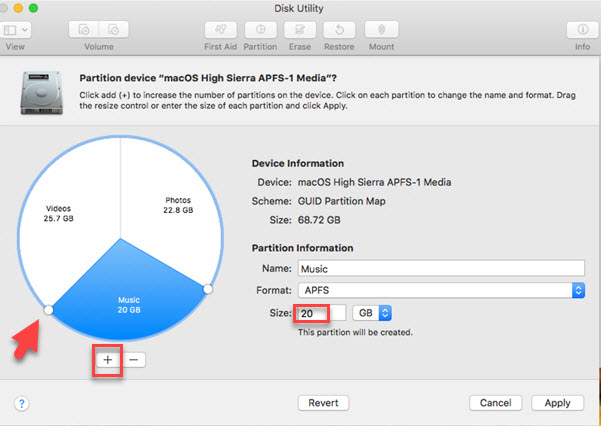
Similarly, you can add more partitions by clicking on the ‘+’ sign. If you want to alter the size of the partitions, you can use the pie chart or enter a value manually. Once the sizes are set, click Apply to save changes.
Please note that although Disk Utility is referring to these as partitions, it is, in reality, a container because this is an APFS formatted drive.
How to add volumes to a container?
Each container in the APFS drive can have one or more volumes. To add volumes to the container, you can make use of Disk Utility.
- Open Disk Utility and on the left menu bar, select the APFS container
- From the Edit menu, select Add APFS volume
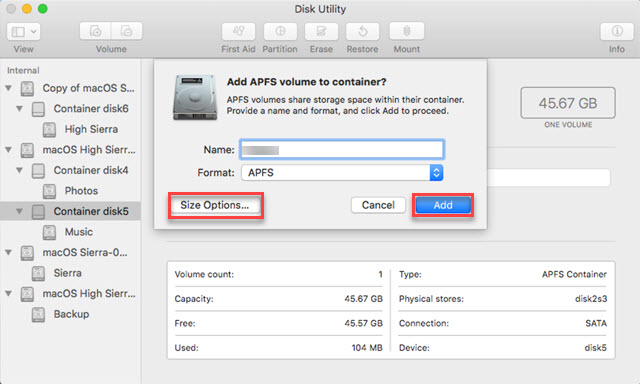
In the next window, assign a name to the volume and set the size options. There are 2 sizing options called ‘Reserve Size’ and ‘Quota Size’. Reserve size is the minimum size the volume cannot go below and Quota size is the maximum size the volume can take. These size limits are useful when you don’t want the volume to consume the entire space available in the container or when another volume shouldn’t take all the space from a volume that needs a minimum amount of space.
Once you have set these volume size limits, click Ok to save changes.
Data recovery using Hi5 Software
Using disk management tools like Disk Utility is extremely risky when you don’t have a backup. It is always suggested that you make a backup first and then proceed with disk related operations. However, in the event that you don’t have a backup and data is lost after partitioning or any other operations such as the one above, then you can use Hi5 data recovery software to your rescue.
It is designed for partition recovery in Mac systems. All your partitions are recovered in original form and hierarchy along with the file names. Once files are recovered, just save them to any desired location.